Einbau von Sicherheitsgurten in einen Classic Mustang
|
Einbau von Sicherheitsgurten in einen Classic Mustang |
|
Note: This page suggests a way to install more modern seatbelts into your '68 or newer classic Mustang, which already has factory mounting points for a 3-pt belt. If you have a '64.5 - '67, or even a very early '68 you won't find these mounting points on your car.
After much procrastinating, I put my other hobbies aside and decided it was well past time to get back to poor old Bloo. Coming up at the end of next week is the big heart-transplant! The 302 is done and waiting for her at my mechanic's shop. I thought it would be nice to get those 3-point seatbelts installed, in anticipation of all the driving she's going to see with that spiffy new engine!
I have to say, having grown up with shoulder belts, it's always disconcerting to drive a car with just lap belts. I can't stand it, and I hate knowing that if some other idiot pulls out in front of me and I hit 'em, I'm going to be the one with a steering wheel imprint on my forehead! So I looked through Rod & Custom, and found an ad for Southern Rods and Parts, who offer 3 point shoulder harnesses for street rods (by popular demand, let me mention that these belts cost $45 each and Southern Rods phone number is 1-800-787-8763) . I ordered a set in Dark Grey, to match the new grey seats. I also ordered the hardware mounting kit, which is some big bolts and reinforcement plates, which may have been a little overpriced at $15, but I didn't know that until I saw them.
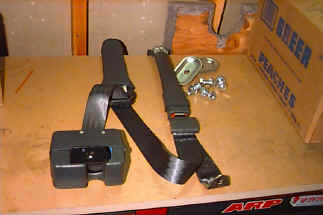 Here is one complete seatbelt.
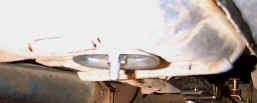
Step one was to locate the existing upper pivot mount, which was installed at the factory on '68 Mustangs, and then hidden under the headliner, since my plain-jane coupe didn't have shoulder belts. The mount is right behind the coat-hook. I cut a little hole in the headliner to get to it.
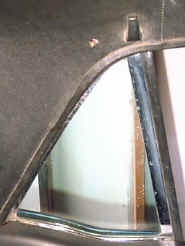
It was tricky to find a bolt to fit this, but trial and error led me to a 3/8 X 18 X 1 inch bolt, which worked perfectly.
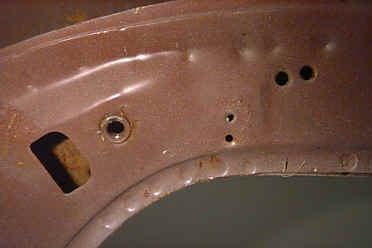
(Much later, when I was chasing Bloo's rust problems, I removed the headliner. This is a picture of the upper mount on the driver's side. The rail here is spotwelded to the roof along the lower edge, and there is another piece of metal spotwelded along the top. You can see the threaded nut which is just to the right of the big "D" shaped hole. That is where the seatbelt attaches. The nut is attached to a backing plate that's about the same size as the big hole to the left of the nut. The metal where the nut is located is only one layer thick. There has been some discussion lately as to if this area is really strong enough to hold the belts and not tear loose in a bad accident. You're going to have to use your own best judgement on that one. I think anything's better than just lap belts).
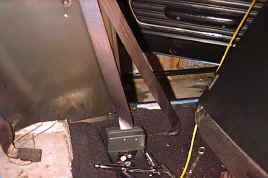
Next I mounted the retractor assembly in the floor. The rest of the belt uses the existing mounts, but I needed to make a hole to mount the retractor on the floor where it will be level and out of the way. If it's not level, the belt will lock and not pull out easily. This is how it locks when you brake hard; the car leans forward during braking and the retractor locks because it's not level.
I yanked the back seat in order to fold the carpet forward. I mounted the retractor right in front of the backseat and as close to the door as it could go.
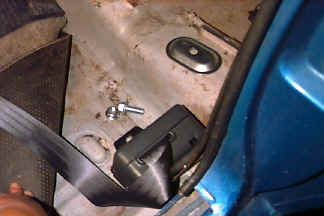
After replacing the carpet and cutting holes through it and the underlayment, I bolted the retractor down, using the reinforcement plate underneith.
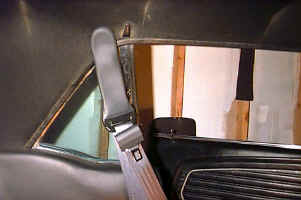
I pulled the webbing out of the retractor far enough to bolt the upper pivot to the existing roof mount. It has a nice rubber cover on it, so it looks very professional once installed.
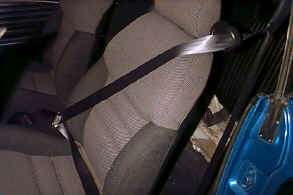
I bolted the remaining end of the seatbelt using the existing hole and mount where the original retractor went (right below the door). On the other side of the seat, I used the existing hole and mount to install the new receiver. I did not use the thick washers, else I would have needed longer bolts.
So that's it. I just need to replace the sill plates and go do the passenger side. My husband and I both tried them out and thought they were comfortable and seemed to have plenty of webbing so they weren't too constricting. So now with high-back bucket seats and 3-pt seatbelts, we have a car I will feel safe driving to work every day. I can't wait to get that new engine!
: I am not a professional mechanic, and do not assume any responsibility for you taking my advice on anything you see here, no matter the consequences. I can't guarentee I did this the best way possible, I'm just letting you see how I did something, so maybe you'll get your own great ideas and do me one better. Use your own best judgement when working on your car and installing safety equipment.